
We’re so excited to share these new recipes with you but promise us this… don’t rush into making them without understanding the “why” of how they’ll work for you. Trim Healthy Wisdom arms you with that knowledge. The Wisdom Recipes are uniquely crafted to bring greater health to your home, but they are just a part of your Wisdom journey. The book takes it much further! Packed with wisdom and practical tools, Trim Healthy Wisdom will empower you to thrive, find balance, and embrace vibrant living. Don’t miss out! Grab your copy and join us in making these your best years yet!
Order Here!
I’m about to share with you that bread has been the bricks and mortar of my and my family’s diet for going on two decades. It has been a huge part of the vibrancy and health I’ve experienced on my THM journey. Following the recipe, there will be an FAQ section that will be your starter course for sourdough making… or, if you’ve already been making sourdough… a course on how to make it healthier and trimming for your body.
Peasant Bread got its name due to being the cheapest, quickest, most sustainable way of feeding my family the healthiest kind of bread 365 days of the year. It does not look like the fancy king’s loaves… but more like ones suited for the peasants… hence its name! I currently make six super large loaves a week… every week. I used to make more when I had more children in the home. You won’t want that many, of course. No problem. I am having you make the perfect amount, no matter your family size or personal needs.


You might see the “make 4 loaves” option at the top of this recipe and think… Serene, you’re crazy… I don’t want to make 4 loaves at a time, especially if is only me eating it. You’ll thank me for this option. Peasant bread keeps well on the counter for several days, then in the fridge for a week or two but it also freezes well. Slice it up and freeze to keep the most gut-healing kind of bread available on hand whenever you desire to pull out a few pieces to thaw in the fridge or toast in the toaster. You’ll want to make either 2 loaves and a batch of the Peasant Protein Muffins or 4 loaves because this bread requires a feisty, Cracked Rye Starter to cause a sufficient rise and also to make this bread the kindest grain bread to your blood sugar. This means the starter needs to be fed a certain amount of cracked rye to get big and feisty enough. The amount of this feisty starter will be more than you’ll use for 2 loaves of bread. But we won’t want to waste it, so that is why you’ll use the leftovers for muffins or for another couple of loaves of bread. More about all this later. But I do recommend you choose the 2 loaves option at your first baking session. You’ll have the perfect amount of Cracked Rye Starter left to make Peasant Protein Muffins, and upon tasting these muffins and realizing I have given you a twofer recipe in a sense, I’ll be your favorite sister and Pearl… with her famous Pearl’s Chili that got more blue ribbons than mine… will be the loser. I will cement my place as the best THM sister… Forever and Amen.
Peasant Bread is very unique in that it is mixed in a bucket – no kneading required, which makes for clean and easy production. If you are not new to sourdough bread making, you may be used to making a Levain. You won’t do that here. I do make a whole grain spelt Levain for my Shabbat Bread (coming out in the hardcover Wisdom Cookbook), but I want to give you a bread that is kinder to your blood sugar and waistline for your every day, so we’re sticking with a pure Cracked Rye Starter. The reason I use a bucket and not a bowl is that number 1, no bowl is big enough for my batch of bread. Number 2, you need a lid for the soaking part of this recipe so no germies and fruit flies or other winged friends find a home in your soaked grain. Number 3, I like to grind ahead of time for multiple batches and have the bread flour measured and stored in stackable buckets all ready for bread-making day. This is the hack that makes my bread-making a sustainable habit (more on that later). If you don’t want to grind and instead purchase pre-ground flour, I give more deets for that in the FAQs.
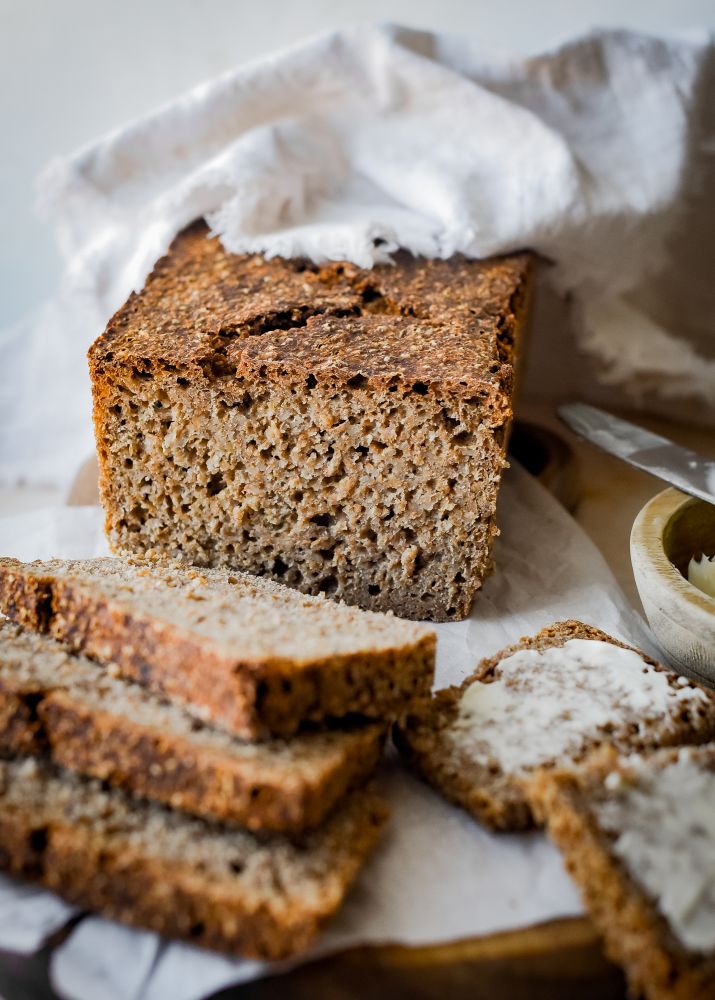
Please read our Ten Gut Gifts chapter in Trim Healthy Wisdom, where the merits of Peasant Bread are fully explained but I’ll pass along some info here too. Don’t expect light fluffy bread! Light and fluffy don’t do your waistline as many favors. Peasant Bread, although perhaps not as outwardly beautiful as a lot of the artistic loaves you see others making, makes your gut beautiful, protects your blood sugar, and helps your waistline in far superior ways. It uses whole cracked rye as a major part of its flour component and is more robustly fermented than most other sourdoughs. The cracked rye is far gentler on your blood sugar than other flours (even other ancient grain flours), and it powerfully increases good gut bugs, which result in fat-burning and disease-fighting short-chain fatty acids. My children’s friends who come to visit call it “Brick Bread”, but in a kind of endearing way…. as they prove their love for it by enthusiastically popping it over and over in the toaster and swathing their butter over it. So, what I said earlier about this bread being the “bricks” of our diet is quite true… hehe! But don’t get scared off. The texture is super moist on the inside and deliciously crispy and crunchy on the outside. When it is toasted up, butter can melt through the little crevices and holes the fermentation forms and is a real treat for family members who enjoy it as an XO. As a true E with lean toppings, it is just as fantastic. The characteristic sour flavor is robust and complex. You will soon be an addict in no time.
I’m going to give you the recipe now, then all the deets will be explained in the Healthiest Sourdough FAQ Course. This will include how to obtain the Cracked Rye Starter and how to use the buckets, etc. (And yes, I’m standing by calling this the “healthiest sourdough” – there ain’t nothing else like it.)
~ Serene
Peasant Bread
Description
Peasant Bread got its name due to being the cheapest, quickest, most sustainable way of feeding my family the healthiest kind of bread 365 days of the year. It does not look like the fancy king’s loaves… but more like ones suited for the peasants… hence its name! I currently make six super large loaves a week… every week. I used to make more when I had more children in the home. You won’t want that many, of course. No problem. I am having you make the perfect amount, no matter your family size or personal needs. This recipe is part of the Wisdom Recipe Collection.
Makes 2 Loaves (with enough Cracked Rye Starter leftover for a batch of Peasant Protein Muffins or choose the double ingredient option and make 4 loaves.)
Ingredients


Instructions
Peasant Bread In Seven Easy Steps
-
Decide between the 2 or 4-loaf batch. Grind, then measure the grain for your choice and place it all in a bucket with the mineral salt (bucket info, where to purchase grain, and option of using pre-ground flour, detailed in FAQ Course).
-
Add the room-temperature water to the bucket. Mix really well with your hands until all the grain is moistened and there are no pockets of dried cracked grain.
-
Once mixed, place the lid on the bucket and let it soak for 12 hours, although you can go longer. (Note - is soak best coincides with the last 12-hour ferment of the Cracked Rye Starter, so they’re ready around the same time (hand mixing, soaking, and how to make a Cracked Rye Starter detailed in the FAQ Course).
-
After the soak time, add the Cracked Rye Starter to the bucket and mix really well with your hands again (Cracked Rye Starter info detailed in the FAQ Course)
-
Spray bread tins well with coconut or olive oil. Place the soaked dough into the bread tins (info on bread tins detailed in FAQ Course). Leave on the counter to ferment for around 8 hours at room temp… longer if your house is cold. If needed, cover tins with a cookie sheet or cutting board or any flat thing that covers them so flying things don’t get in.
-
Preheat the oven to 350 degrees. Place a Pyrex dish filled with water on the bottom rack to provide continual steam to the bread while baking. Put loaves on the middle rack and bake for 3 hours - yes 3 hours (details on the cooking time detailed in FAQ Course).
-
Remove loaves from the oven but keep the bread in the tins. Use a moistened, clean, wrung-out dish towel and lay it over the tops of the bread. Leave the bread in the tins covered for 3 hours before removing (info on removing bread from tins detailed in the FAQ course).